DIY Emergency Bow Tie – Step-by-Step Guide

Materials Needed: Step 1: Prepare the Pattern Draw or print the pattern based on your desired bow tie size. Use a ruler if you’re making it manually—it’s just a few simple rectangles. Step 2: Cut the Fabric and Batting Use the pattern to cut out your fabric and batting pieces. Ensure precision for a clean finish. Step 3: Iron the Batting Onto the Fabric Attach the batting to the upper half of the largest fabric rectangle on its backside. Leave about 1 cm of space above the batting, as this area will be used for stitching in the next step. Step 4: Sew the Main Piece Fold the main rectangle in half lengthwise (right sides facing each other) and sew along the long edge to form a tube. Step 5: Turn It Inside Out and Close the Ends Turn the sewn piece inside out so the right side of the fabric shows. Then, fold and sew the open ends together neatly. Step 6: Sew the Center Strip Take the smaller rectangle meant for the center of the bow and sew it into a small loop (or tube), just like you did with the main piece. Step 7: Shape the Bow Tie With the seam at the center, flatten the tube and fold it horizontally in the middle. Fold each side again towards the center to create the bow shape. You can use a rubber band temporarily to hold the folds in place. Step 8: Attach the Center Loop Wrap the center loop around the folded bow and sew the ends at the back. It may not be extremely tight, but that’s okay—secure it with a few hand stitches for a snug finish. Step 9: All Set! Your stylish bow tie is now ready to wear! Perfect for a quick, classy look for any event.

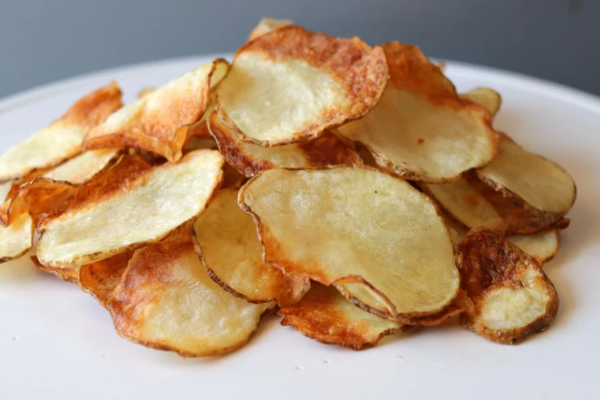
DIY Crispy Air Fryer Potato Chips

🥔 Ingredients 🧰 Tools & Equipment 🔪 Step 1: Slice the Potatoes 🧂 Step 2: Dry and Season 🌬️ Step 3: Air Fry the Chips Optional: Add extra seasoning like pepper, paprika, or garlic powder while the chips are still warm. 🎉 Enjoy! These homemade air fryer potato chips are a healthier alternative to store-bought versions—simple, tasty, and perfectly crispy!

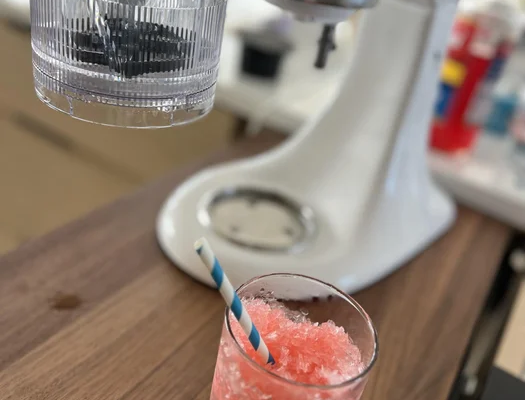
DIY The Ultimate Homemade Shaved Ice – Brain Freeze Guaranteed!

What You’ll Need: Step 1: Freeze Your Ice Like a Pro ✅ Fill the Molds: Use the provided ice molds and fill them with water, juice, or flavored liquid if you want an extra burst of taste.✅ Freeze Overnight: Let the molds sit in the freezer for at least 8 hours or overnight. Fully frozen ice works best for a fluffy texture.✅ Pro Tip: Make extra ice blocks and store them in ziplock bags so you’re always ready for a chilled treat. Step 2: Set Up Your Shaved Ice Attachment ✅ Securely attach the ice shaver to your mixer or machine. Lock everything in place before starting to avoid messes or surprise snowstorms in your kitchen. Step 3: Shave That Ice ✅ Place one frozen block into the shaver. Turn your machine to the recommended low setting.✅ If everything is set correctly, you’ll see soft, fluffy shaved ice falling into your bowl or cup. If it’s coming out in chunks, double-check your settings—or embrace the texture for a slush-style treat. Step 4: Add Flavor ✅ Drizzle your chosen syrup, juice, or flavoring over the shaved ice.✅ Gently stir using a spoon or straw to distribute the flavor evenly. Don’t overdo it—too much liquid can turn your fluffy ice into a mushy puddle. Step 5: Time to Enjoy ✅ Grab a spoon or straw, dig in, and enjoy your homemade frozen delight!✅ Bonus: Snap a pic before it melts—because aesthetic food moments are a must. Just pace yourself if you want to avoid the inevitable brain freeze.

DIY How to Make a Beaded Bracelet: Step-by-Step Guide

Materials Needed: Instructions: Step 1: Measure the Wire Wrap the wire around your wrist to find your desired bracelet size. Add about 2 inches to each end to allow space for looping and securing the clasp. Step 2: Cut the Wire Use the wire cutter on your tool to snip the measured length of wire. Step 3: Attach Jump Ring and First Crimp Bead Thread a crimp bead about 1.5 inches from one end of the wire, followed by the jump ring. Loop the wire back through the crimp bead to form a small loop holding the ring. Flatten the crimp bead using the flat edges of the tool to secure it in place. Step 4: String the Beads Begin threading the beads onto the wire one by one, until you have about 2 inches of wire remaining. Step 5: Attach Second Crimp Bead and Lobster Clasp Thread the second crimp bead and the lobster clasp onto the remaining end. Loop the wire back through the crimp bead and flatten it with the tool to secure the clasp. Step 6: Trim Excess Wire Use the cutting part of the tool to remove any extra wire sticking out. Step 7: Show Off Your Bracelet Secure the lobster clasp onto the jump ring. Your handmade bracelet is now ready to wear or gift!

DIY Pi Pie Recipe

Pi Pie Recipe: A Fun and Delicious Experiment Materials Used: Crust: Filling: Step 1: Planning For this pie, I decided to make a mini version to avoid using up all the ingredients if it didn’t turn out well. I had to convert measurements from different recipes, ensuring everything was measured in units that resulted in numbers close to 3.14. Step 2: Preparing the Crust I began by measuring the ingredients for the crust. To get precise measurements, I used a scale, which helped ensure accuracy in the quantities I used. Step 3: Mixing the Crust Ingredients Once the ingredients were measured, I combined them into a dough. I hand-kneaded the mixture on a cutting board until it had a nice doughy consistency. Step 4: Rolling Out the Dough Next, I rolled the dough out on a cutting board using a rolling pin to shape it for the pie crust. Step 5: Baking the Crust After shaping the dough, I placed it in the oven set to 350°F and baked it for 8 minutes. This step was essential to ensure the crust was fully baked and crispy. Step 6: Preparing the Filling While the crust was baking, I measured and mixed all the filling ingredients in a large bowl. Step 7: Assembling the Pie Once the crust was done baking, I added the prepared filling. I had extra dough left over, so I decided to create a woven design for the top crust. After assembling the pie, I placed it back in the oven for 19 minutes until the crust edges turned golden brown. Step 8: The Final Touch Once the pie was done baking, the smell was fantastic, and it came out much better than I expected! It held together well in the oven, which was a pleasant surprise. Step 9: Enjoy! When I cut the pie, cinnamon-flavored juice spilled out, but it still tasted delicious. Although the filling might have been a bit too sweet and the crust had too much salt, the flavors balanced out nicely. While I wouldn’t recommend using only 3.14 measurements for every pie, this experiment turned out to be a fun and tasty experience.

DIY paper Roses: A Step-by-Step Guide

Easy Paper Roses: A Step-by-Step Guide. Making beautiful paper roses is a simple and fun craft project. Follow these steps to create stunning flowers using just a few basic supplies. Whether you’re decorating a space, making a gift, or just enjoying a creative activity, these paper roses are a perfect choice! Supplies You’ll Need: Step 1: Prepare the Paper Step 2: Cut Out the Circle and Draw a Spiral Step 3: Roll the Paper to Form the Flower Step 4: Secure the Flower Step 5: Create the Stem Step 6: Assemble the Flower and Stem Step 7: Final Touches Now that your rose is assembled, consider adding a few green leaves for extra dimension and color. These can be cut from green construction paper and glued onto the stem or around the flower. Repeat the process to create a whole bouquet if you like! Tips for Success: Now you have a stunning set of paper roses to show off or give as gifts! Have fun crafting!

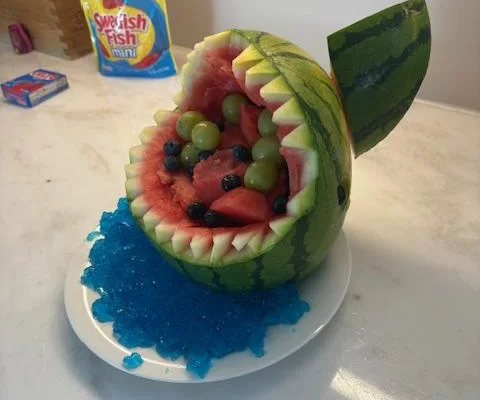
DIY Watermelon Shark for Your Summer Party

How to Make a Fun and Refreshing Watermelon Shark for Your Summer Party Looking for a fun and creative way to serve fruit at your next summer get-together? Try making a Watermelon Shark! This unique and tasty treat will be the highlight of any party, especially on a hot day. It’s a perfect blend of refreshing watermelon, colorful fruit, and a bit of Jello for that extra “water” effect. Here’s how you can create your very own Watermelon Shark, step-by-step. Supplies You’ll Need: Step-by-Step Instructions: Step 1: Cut the Watermelon’s Base Start by cutting one end of the watermelon at an angle. This will create a stable base for your shark to sit on. While you don’t absolutely have to cut at an angle, it does help the shark sit more securely. Step 2: Create the Mouth Opening Next, carefully cut a large opening for the shark’s mouth. Aim for about a quarter of the watermelon to be cut away. This will serve as the entry point for your snacks and the place where the shark’s “teeth” will go. Step 3: Remove the Watermelon Flesh Now, scoop out the inside of the watermelon, saving the flesh to use later for snacks. Be careful while scooping—cut it as neatly as possible, as this will help your watermelon shark maintain a nice shape. If the mouth is uneven or too jagged, it may look a little awkward later when you fill it. Step 4: Shape the Mouth Trim the edges of the mouth to form a jagged pattern, creating the shark’s teeth. Don’t cut all the way through—just trim enough to reveal the white inner part of the watermelon, which will mimic the look of teeth. Step 5: Cut the Teeth Using the remaining watermelon scraps, create zigzag shapes to form the shark’s teeth. You can leave these pieces in place for a more realistic effect. No need to throw them out—these scraps help bring your shark to life! Step 6: Make Fins Next, take some of the leftover watermelon pieces and cut them into fin shapes. Attach these fins to the sides of your watermelon shark using toothpicks. These will help give your shark a more authentic appearance. Step 7: Add Snacks and Jello Now for the fun part! Fill the inside of the watermelon shark with your chosen snacks. I recommend using pieces of the watermelon you scooped out, as well as other fruits like grapes, blueberries, and even Swedish Fish for a fun touch. Once your shark is filled, pour blue Jello around the fruits to simulate water. It adds color and a fun texture to your shark. Step 8: Serve and Enjoy! And that’s it—your Watermelon Shark is ready to go! It’s a fun, impressive centerpiece for your party, and it’s packed with delicious and healthy treats. Everyone will love the creativity, and it’s sure to be a hit with both kids and adults alike. Enjoy your summer party with this delightful and refreshing Watermelon Shark!

DIY Creating Simple Compostable Baskets for Easter & Purim

Creating Simple Compostable Baskets for Easter & Purim This year, I decided to make simple and eco-friendly baskets for Purim gifts. Purim, a Jewish holiday, is a time when we exchange baskets of fruit, sweets, and treats with friends and neighbors. I haven’t done this in years, but now that I have a child, the idea resurfaced after reading an article, “A six-step guide to making mishloach manot that don’t suck” from The Forward. I thought it would be fun to bring back the tradition and share these festive treats with my neighbors. However, when it came to deciding what kind of container to use, I wanted something more than just a paper plate covered with plastic wrap. After a bit of thought, I knew I wanted to make a basket, but not just any basket—something simple, compostable, and environmentally friendly. I wanted to create a container that wouldn’t add to plastic waste, especially since I’m trying to reduce my environmental footprint. The solution I came up with was to make compostable baskets. In many major cities, compostable materials can be collected and processed, so instead of ending up in a landfill, the waste would return to the earth, contributing to a more sustainable cycle. It’s a satisfying solution to the disposable basket problem, and while it’s more complicated than some options, it feels better knowing it won’t add to the global trash pile. Materials Needed: Steps to Create Compostable Baskets: Step 1: Prepare the Paper Tape Start by cutting a long strip of paper tape, about 40 cm (you can adjust based on your bowl size). Lay a paper towel across the tape, aligning one edge with the edge of the tape. This helps prevent the adhesive from sticking to the inside of the tape strip. Once applied, use scissors or a craft knife to trim the excess paper towel along the opposite side of the tape. Step 2: Notch the Bowls Next, take one of your paper bowls and mark where to cut notches on either side of the rim. I experimented with different notch styles and found that angled notches worked best for me, but you can go with whatever design you prefer. Use this first bowl as a template to cut similar notches on your other bowls. After cutting, trim a small portion of the rim at each notch to prevent it from flaring out. Step 3: Attach the Handle Now, it’s time to create the handle. Take the paper tape with the attached paper towel and position it so that the ends align with the notches on opposite sides of the bowl. Stick the tape to the outside of the bowl to form the handle. This should hold the handle in place securely. Step 4: Add Final Touches To add a festive touch, I found some paper Easter grass, which I used to line the inside of the basket. You can also twist the handle for a different look. While using the Easter grass may seem counterintuitive given my efforts to reduce consumption, it’s still compostable and adds a nice seasonal touch. You can feel good knowing that these baskets are made from all paper products, making them fully compostable. If your neighbors are into composting, it’s a great idea to let them know that these baskets can go right into their green bin along with their food scraps. With this simple, eco-friendly basket, you can share the joy of Purim or Easter without adding to the waste problem, making it a thoughtful gesture for both the season and the environment.

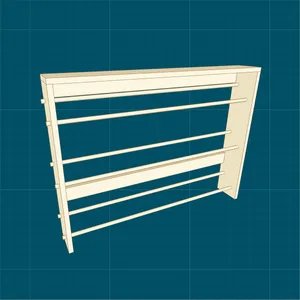
Do It Yourself Shoe Rack

Do It Yourself – THE CLIFF NEWS 3-4 minutes DIY Shoe Rack Project Create a practical and stylish shoe rack for your home with this easy-to-follow guide. In this project, you will learn how to build a wall-mounted shoe rack with a sturdy design that works well for keeping shoes organized and off the floor. Here’s how to make it! Materials You’ll Need: Step-by-Step Guide: 1. Prepare the Side Pieces Begin by cutting two side pieces to the desired length (28 inches). Using a Speed Square, draw three angled lines: the first line should be 1-1/2 inches from the top, and the other two should be spaced 9-3/4 inches apart. Mark the angles at 1-1/2 inches and 4-1/4 inches from the front edge. 2. Notch the Sides for the Baseboard To ensure the rack sits flush with the wall, you’ll need to notch out a section of each side piece to fit around the baseboard. Measure the height and thickness of your baseboard, then use a jigsaw to cut the notches accordingly. A sharp jigsaw blade helps prevent rough edges. 3. Drill Holes for the Dowels On each side piece, mark the location for dowel holes. Use a drill press with a 5/8-inch Forstner bit to drill clean, precise holes at each mark. For best results, place a scrap piece of wood beneath the material to avoid tear-out during drilling. 4. Attach the Top Piece Cut a top board to a length of 37-1/2 inches, then position it on top of the side pieces. Secure it in place using brad nails, ensuring the sides are mirrored and the drilled holes align properly. 5. Install the Cross Members Cut two cross members (36 inches each) to fit between the side pieces. Drill pocket holes on both ends of the cross members, then attach them to the side pieces using pocket hole screws. Position one cross member against the top and the other 8 inches from the bottom to provide added support. 6. Insert the Dowels Cut six dowels to a length about 1 inch longer than the width of the rack. Slide the dowels into the drilled holes, leaving approximately 1/2 inch of each dowel protruding from both sides. If the dowels do not spin freely, secure them by driving brad nails through the sides into the dowels. 7. Mount the Shoe Rack Finish your shoe rack by painting, staining, or applying a coat of polyurethane to protect the wood. Once the finish has dried, locate the wall studs where you plan to mount the rack. Position the rack and drive screws through the cross members into the studs for a secure installation. Final Touches Now your custom wall-mounted shoe rack is ready to keep your footwear organized in style. Whether you opt for a simple wood finish or add a bit of paint, this rack is both functional and a great addition to your space. By following this guide, you’ll have a sturdy, custom-built shoe rack that enhances both your home’s organization and aesthetic. Happy building!

Switch Language »